

[ad_1]
Wish to use Firebase and different Web2 dev expertise to create a Web3 pockets tracker? If that’s the case, observe alongside on this article and sort out the offered step-by-step tutorial! However, earlier than transferring into the central a part of this text, it is advisable perceive the fundamentals. Thus, you’ll first study what a Web3 pockets tracker is and why it is sensible to make use of Firebase to create one. With the fundamentals underneath your belt, we’ll briefly study the top results of our instance pockets tracker dapp. That method, you’ll know precisely what to anticipate from the tutorial, and also you’ll be able to create a Firebase Web3 pockets tracker!
Then again, in the event you already know all the basics, you’re most likely keen to leap straight into the “BUIDLing” course of. In that case, create your free Moralis account and observe our steps within the “Tutorial: Create a Firebase Web3 Pockets Tracker with Moralis” part immediately!
What’s a Web3 Pockets Tracker?
A Web3 pockets tracker is usually a decentralized utility (dapp) that is ready to monitor the actions of blockchain wallets. With it, customers can discover pockets transactions and balances. Moreover, in some dapps, customers can search by pockets addresses. In others, customers want to attach their wallets to get the complete perception. Our tutorial will give attention to the latter – solely specializing in transactions.
Web3 wallets are basically all public blockchain addresses that may retailer cryptocurrencies/tokens. A crypto pockets can retailer crypto cash, fungible tokens, non-fungible tokens (NFTs), and even semi-fungible tokens (SFTs). Furthermore, Web3 or crypto wallets are available in many varieties – from items of paper to {hardware} gadgets, such because the pockets fashions from Ledger. Nevertheless, the most well-liked Web3 pockets to this present day is arguably MetaMask. This scorching pockets comes within the type of a cellular app and browser extension. For growth and testing functions, the MetaMask browser extension tends to be the most suitable choice. As such, it’s the pockets we’ll use to display our instance Web3 pockets tracker dapp.

Why Use Firebase When Making a Web3 Pockets Tracker
Briefly, it is sensible to make use of Firebase when creating Web3 dapps due to its spectacular Web2 backend options and Firebase’s integration with Moralis.
Firebase is a growth platform for constructing, rising, enhancing, and sustaining all types of functions, together with advanced video games. This backed dev platform is constructed on prime of Google’s infrastructure, which supplies it a excessive popularity. In any case, there are hundreds of thousands of companies utilizing the Firebase platform worldwide, together with Twitch, Glovo, 9gag, and lots of others. Moreover, Firebase can simply be built-in with different sensible instruments, resembling adverts, enterprise messaging apps (e.g., Slack), and even the Moralis Web3 API! Furthermore, the mixing with Moralis allows you to use Firebase when making a Web3 pockets tracker.
All in all, Firebase can prevent plenty of time because it provides you with options and instruments you’d in any other case have to construct your self. This contains internet hosting and database options, analytics, file storage providers, push messaging, and far more. As well as, Firebase comes with spectacular scaling alternatives that may make issues so much less complicated for you. Basically, with Firebase in your aspect, you don’t want to reinvent the wheel. As an alternative, you get to commit your most consideration to creating seamless utility experiences. Nonetheless, because of Moralis’ Firebase integration, now you can combine Firebase options in all of your dapps. Consequently, Firebase turns into “Web3 Firebase“.
As we present you the best way to create a Web3 pockets tracker, we’ll give attention to utilizing Web3 webhooks through Moralis’ Web3 Streams API. After all, it’s also possible to use the mixed energy of the 2 backend platforms talked about to create a Web3 Firebase login.
Should you’d like extra content material concerning Firebase, try our article exploring the best way to use Firebase as a proxy API.
Tutorial: Create a Firebase Web3 Pockets Tracker with Moralis
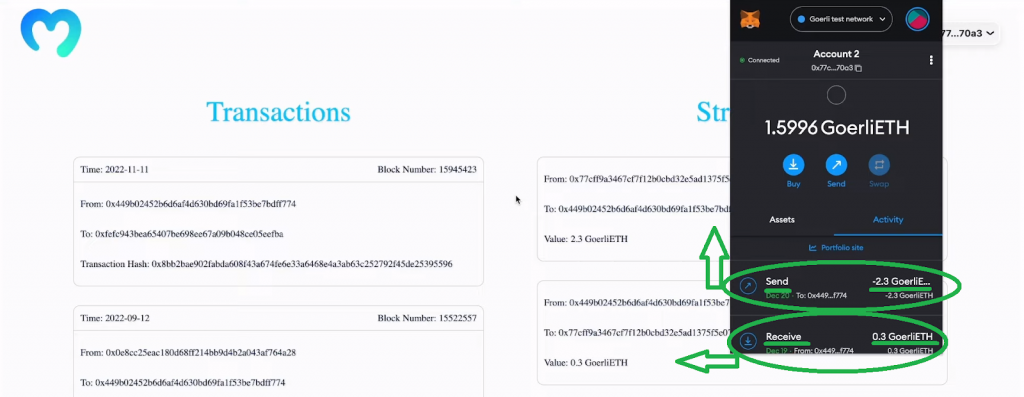
Earlier than we present you the best way to create a Web3 pockets tracker with Moralis and Firebase, let’s do a fast demo of our instance dapp. Therefore, make sure that to take a better have a look at the screenshot above. The latter signifies the gist of our tracker dapp. You’ll be able to see that our dapp comprises two sections: “Transactions” and “Streams”. The transaction part shows all of the transactions related to the related pockets. Furthermore, it shows the time, block quantity, “from” tackle, “to” tackle, and transaction hash. Then again, the “Streams” part listens to stay transactions for any related pockets and shows the “from” and “to” addresses and the worth of the transaction in query.
As well as, as you possibly can see within the screenshot above, we’re specializing in the Goerli testnet. Nevertheless, because of Moralis’ cross-chain interoperability, we might be focusing on any supported blockchain or all of them. Moreover, it’s also possible to see that our instance dapp shows the related pockets’s Goerli ETH stability and tackle (top-right nook). Now, let’s have a look at how our dapp connects wallets and the way it registers “Streams”.
That is what our dapp seems to be like earlier than we join our pockets:
As soon as we click on on the above “Join Pockets” button, we are able to select which pockets we need to use. Since we now have MateMask prepared, we choose that pockets:

Now that we’re related, we are able to truly execute an on-chain transaction on the Goerli testnet; the “Streams” part will register it:
Required Setups
The above dapp makes use of Moralis’ EVM API for transactions and Moralis’ Streams API to take heed to on-chain occasions and, in flip, feed the “Streams” part. As well as, it makes use of Firebase as a database and for internet hosting. Moreover, the dapp makes use of RainbowKit and Moralis’ Web3 Auth API for seamless pockets connection, and NextJS for the frontend. Final however not least, it makes use of a number of dependencies, together with “wagmi” and “axios“. Furthermore, you’ll discover ways to implement all these instruments in the event you observe our lead as we present you the best way to create a Web3 pockets tracker just like the one demonstrated above.
Transferring on, you’ll first get to see the best way to care for the preliminary setup in Firebase. We’ll present you the best way to set up the required dependencies and create each the backend and frontend to your tracker dapp. After all, you don’t want to start out from scratch; the entire code awaits you on our GitHub repository web page. So, basically, you simply have to care for the setup, set up the right dependencies, and tweak our code by populating sure variables along with your keys.
Preliminary Firebase Setup
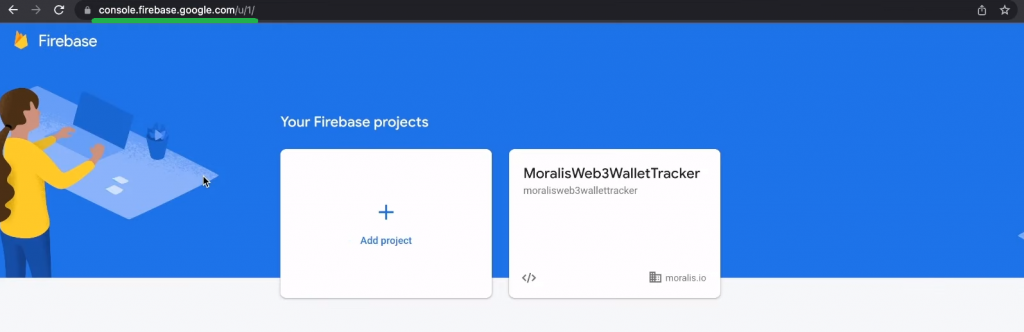
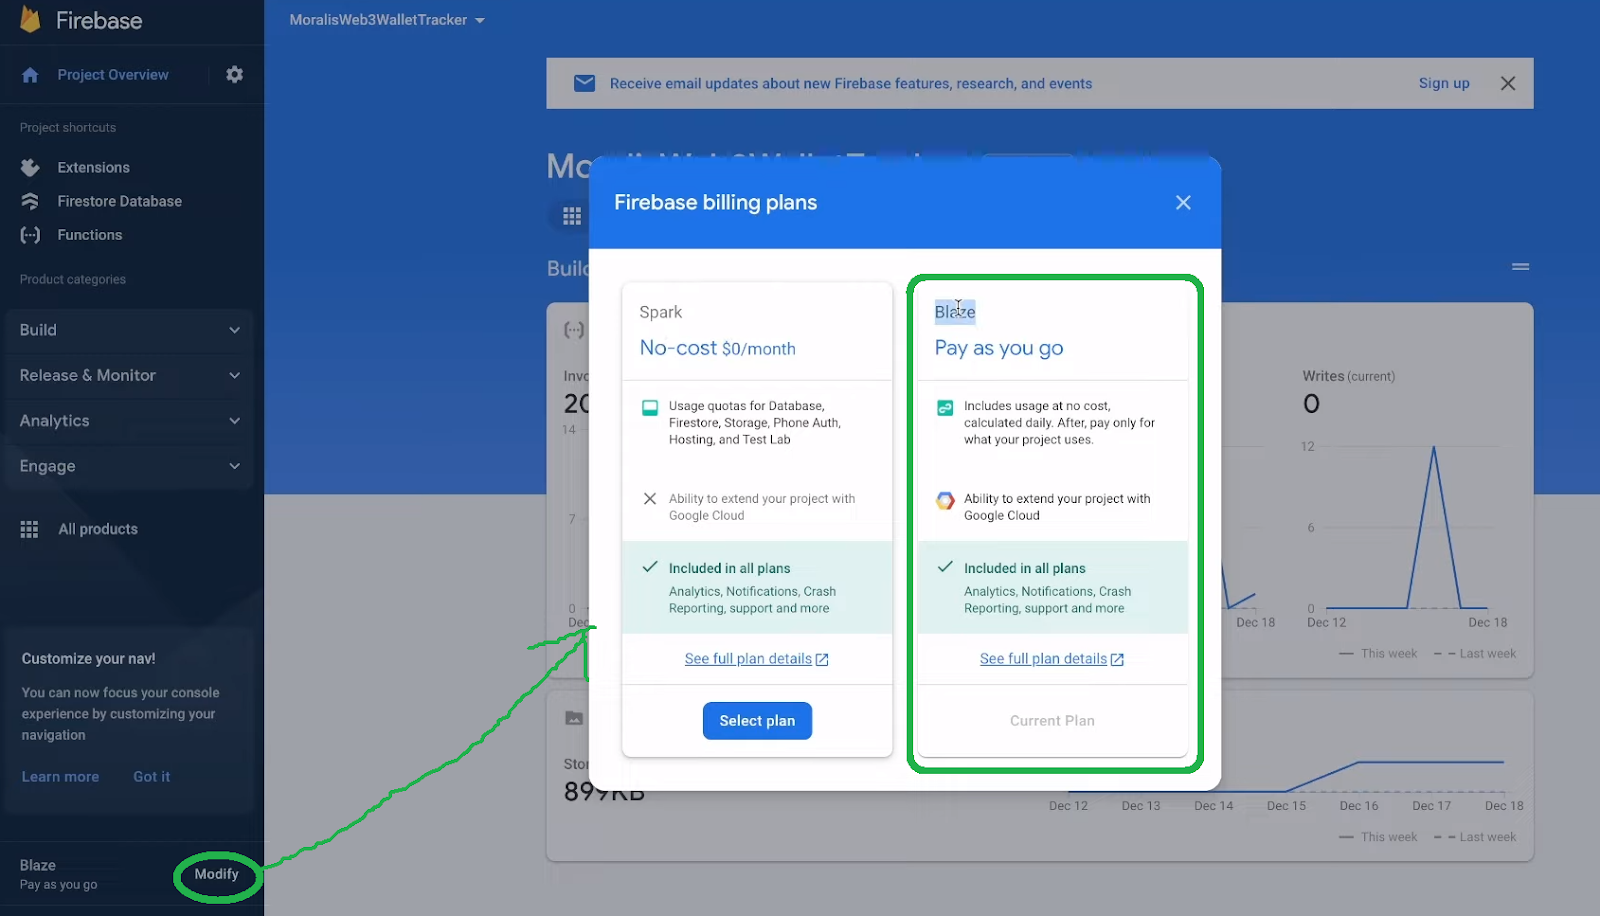
In case you don’t have your Firebase account but, create it now. Subsequent, add a brand new venture. As you possibly can see within the above screenshot, we named our venture “MoralisWeb3WalletTracker”. So, to keep away from any confusion transferring ahead, we encourage you to make use of the identical title. Moreover, so as to have the ability to use the options required to finish right now’s tutorial, you additionally want to change your Firebase billing plans. Thus, make sure that to change to the “Blaze” plan:
Subsequent, create the “moralis-firebase-web3-tracker” folder and open it in Visible Studio Code (VSC). Then, use VSC’s terminal inside that folder and execute the next command:
npm set up -g firebase-tools
The above command will arrange your system with Firebase. As such, you’ll have the ability to accomplish the Firebase login with this command:
firebase login
By working the above command, the terminal will immediate your browser, and also you’ll have the ability to log in utilizing your credentials. Subsequent, initialize your Firebase tasks by coming into the command beneath:
firebase init internet hosting
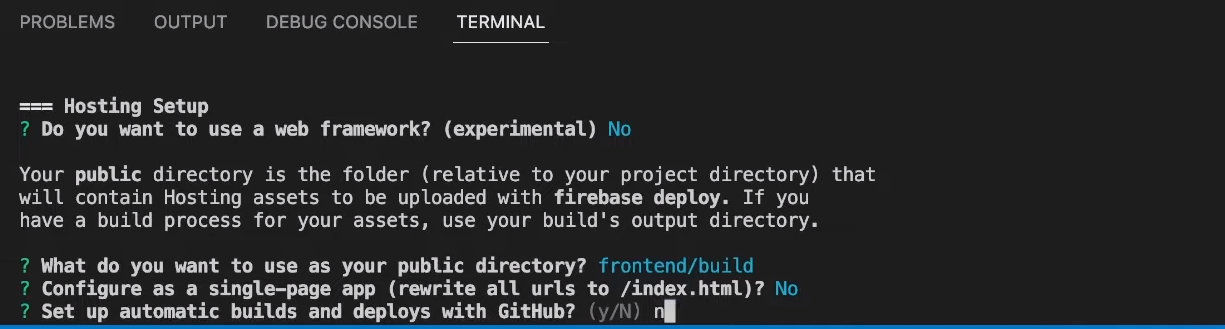
After working the above command, you’ll want to make use of your terminal to pick out the acceptable choices. Because you’ve already created your Firebase venture above, choose the “Use an present venture” possibility. Then, select “MoralisWeb3WalletTracker” (in the event you used that venture title). Subsequent, you could be requested if you wish to use an internet framework. In that case, select “no” and hit enter. Then, enter “frontend/construct” to make use of as your public listing. Furthermore, you don’t have to configure it as a single-page app, nor do it is advisable arrange automated builds and deploys with GitHub:
By finishing the above setup, your Firebase venture needs to be able to create a Web3 pockets tracker:

Putting in the Moralis Streams Extension for Firebase
To put in the Moralis Streams API extension for Firebase, enter the next command:
firebase ext:set up moralis/moralis-streams
Then, you’ll be requested in the event you want to proceed, so make sure that to hit “Y”. Subsequent, you’ll get to pick out one of many given places:

Because the above screenshot signifies, you possibly can select “Iowa (us-central1)”. Moreover, you’ll additionally have to resolve the place you need to retailer your secrets and techniques. Once more, be at liberty to observe our lead and go along with Google Cloud Secret Supervisor:

Within the subsequent substep, it is advisable enter your Moralis Web3 API key:

Observe: Should you face an error with the above substep, make sure that to make use of the video on the backside of this text, beginning at 5:52.
To acquire your Moralis Web3 API key, it is advisable have your Moralis account prepared. In case you haven’t created your account but, accomplish that now (you could use the hyperlink on the outset of the article). Together with your Moralis account up and working, you’ll have the ability to entry your admin space. From there, you possibly can copy your API key in these two steps:

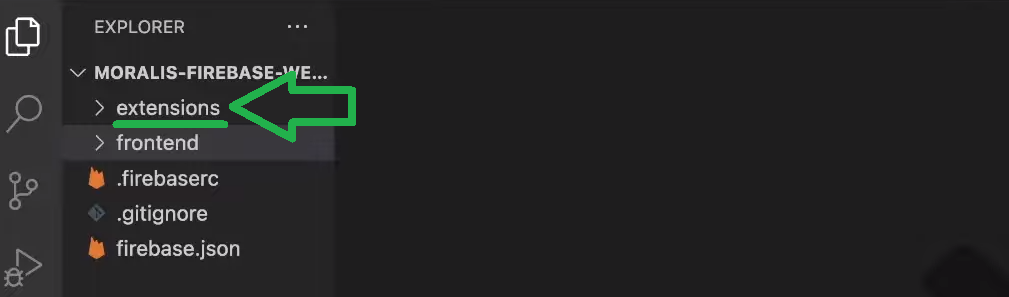
Lastly, return to your terminal, paste within the copied key, and hit enter. Consequently, you’re going to get the “extensions” folder in your venture’s folder:
Transferring on, it is advisable run your Firebase venture utilizing the next command:
firebase deploy –only extensions
After working the above command, you’ll additionally want to substantiate that you just need to proceed deploying these extensions. Plus, you’ll want to stick in your Moralis Web3 API key as soon as extra:

Observe: It will probably take about 5 minutes for the extensions to put in.
Extra Firebase Setup
As soon as the extension is put in, you possibly can open it inside your Firebase panel (through the “Handle” button). Subsequent, choose the “How this extension works” possibility:

As indicated within the picture above, make sure that to pick out and replica the principles for this extension. Then, go to “Construct/Firestore Database”:

There, you possibly can create a brand new database in take a look at mode. Together with your database prepared, you’ll have the ability to go to the “Guidelines” tab, the place it is advisable paste the above-copied guidelines:

Your database is empty for now; nonetheless, when you arrange your stream, it is going to register on-chain occasions.
Lastly, choose the “Capabilities” possibility contained in the “Construct” part:

As soon as on the “Capabilities” web page, you’ll have the ability to copy your set off URL:

Setting Up Your Moralis Stream
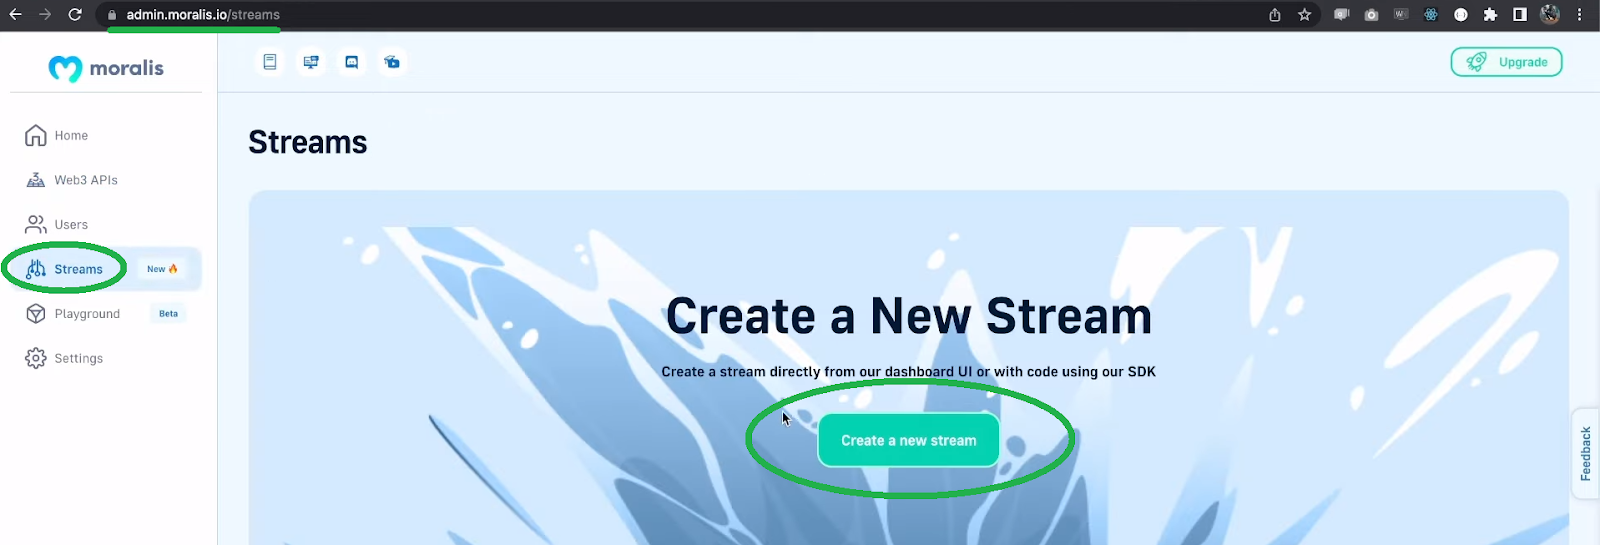
Our “the best way to create a Web3 pockets tracker” quest is coming alongside properly. You’ve reached some extent the place it is advisable create your Web3 stream. As such, go to your Moralis admin space and choose the “Streams” panel. Then, click on on the “Create a brand new stream” button:
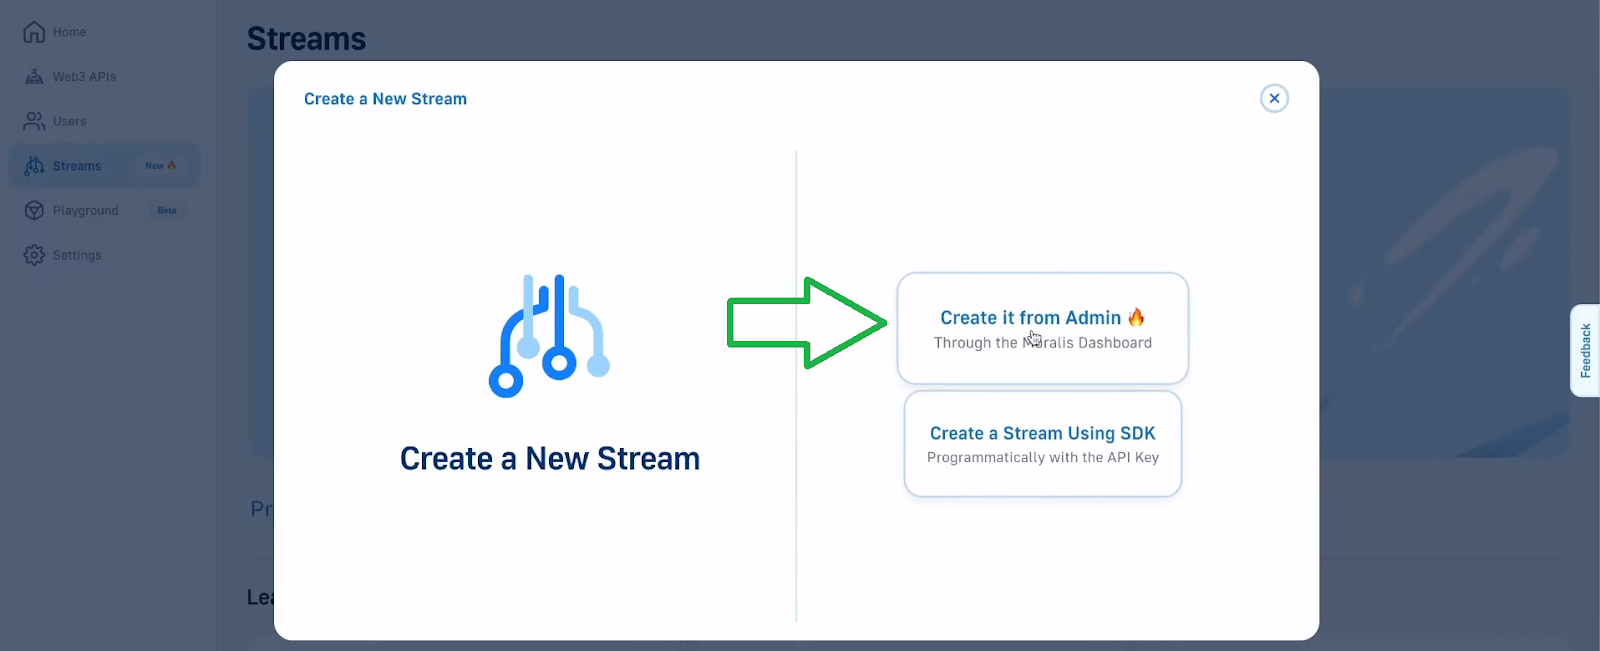
Subsequent, choose the “Create it from Admin” possibility:
On the next two steps, click on on “subsequent” and “executed” to get to the “Stream Particulars” web page. That is the place it is advisable paste the above-copied URL into the “Webhook URL” subject:
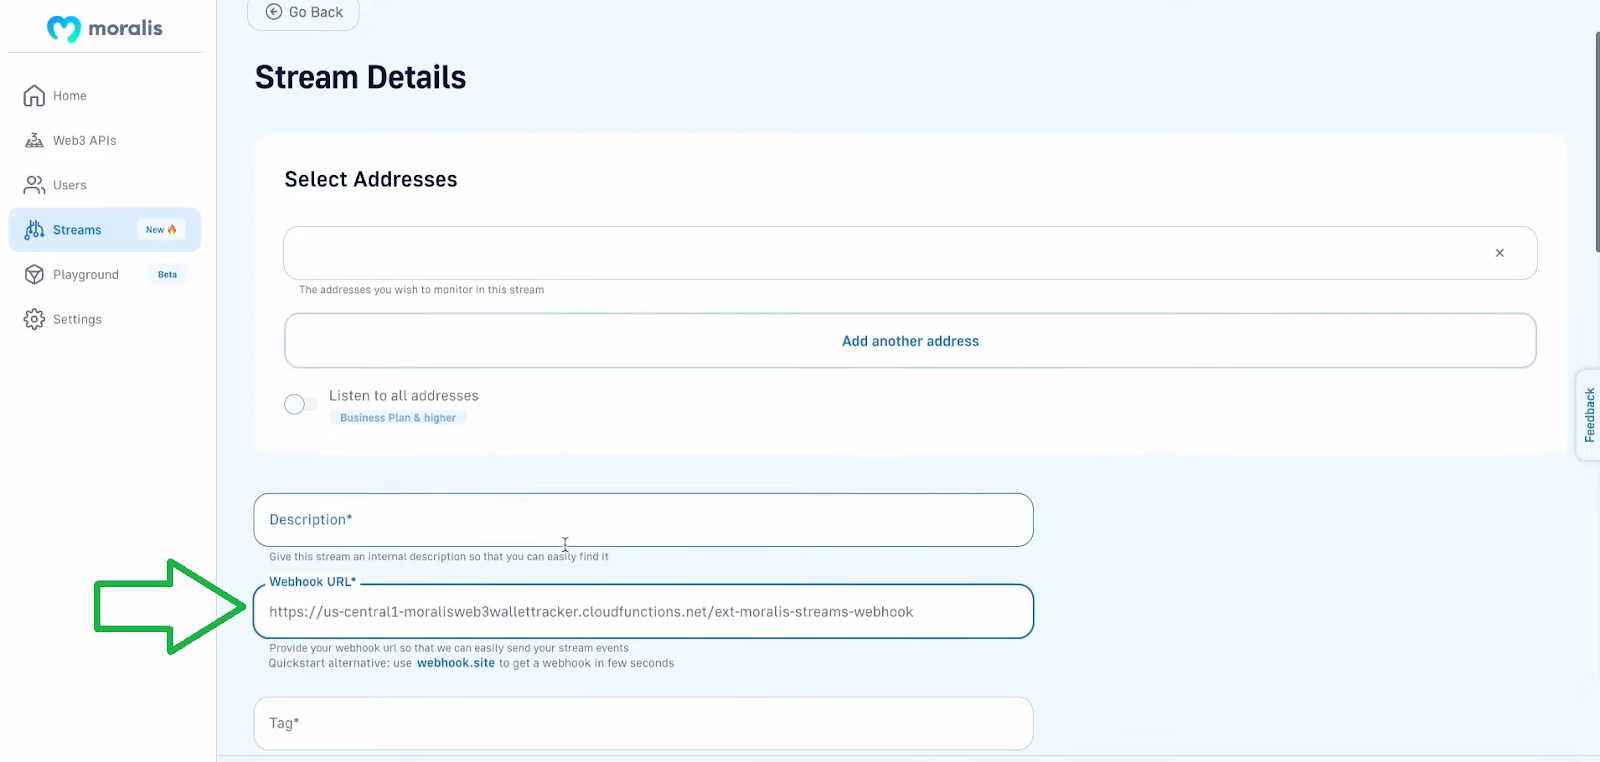
Trying on the above screenshot, you possibly can see that it is advisable enter an outline and a tag to your stream. Once more, be at liberty to observe our lead:

On the prime, paste within the pockets tackle you need to monitor. Then, scroll down and choose the specified networks. Should you bear in mind our demo, you realize to give attention to the Goerli testnet:

As well as, for the sake of this “the best way to create a Web3 pockets tracker” tutorial, let’s give attention to native transactions:

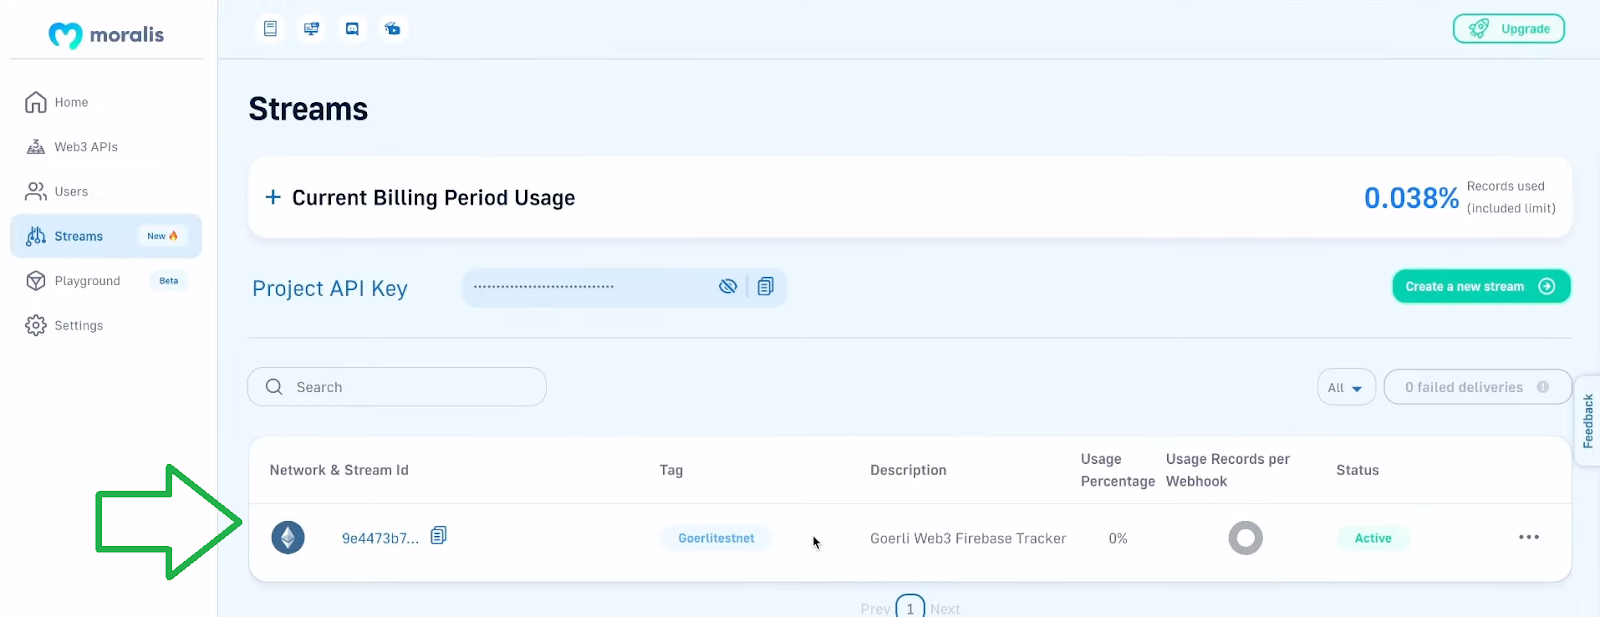
Lastly, hit the “Create Stream” button within the bottom-right nook. Consequently, it is best to see your new stream in your “Streams” panel:
Testing Your Stream
Together with your stream in place, you should utilize your pockets to execute a transaction. Ensure that to make use of two wallets that you just management and that considered one of them matches the tackle utilized in your stream.
Observe: Should you want further steerage on the best way to execute a transaction with MetaMask, use the video beneath, beginning at 11:20.
When you’ve efficiently executed your take a look at transaction, you possibly can return to the “Firebase Database” web page and refresh it. Now, it is best to see the occasion registered within the “Information” tab:

By clicking on the “Goerlitestnet” tag, you get to discover the associated doc (your transaction) and see all of its particulars:

The above-highlighted body marks the small print you should utilize as you proceed to create a Web3 pockets tracker dapp.
Code Walkthrough
With the above setup accomplished, you may have every thing able to create your tracker dapp. Because you get to make use of our code, this half can be fairly easy. In any case, our code comprises the “backend” and “frontend” folders with all of the required scripts. Nonetheless, you should utilize the video beneath (12:14) for extra detailed steerage. That is the place you’ll first study which dependencies it is best to set up. These embrace “cors“, “dotenv“, “specific“, and “moralis“. Therefore, it is advisable run the next command in your “backend” folder:
npm i cors dotenv specific moralis
Under are the dependencies it is advisable set up in your “frontend” folder:
npm i firebase @firebase/firestore axios @rainbow-me/rainbowkit wagmi
Don’t forget to create your “.env” file within the “backend” folder and populate it with the “MORALIS_API_KEY” variable along with your Moralis Web3 API key as its worth. The core of the backend functionalities is roofed by the “index.js” backend script (14:21). That is additionally the place you possibly can see the ability of Moralis’ EVM API and the way the next brief snippet of code does all of the heavy lifting:
const response = await Moralis.EvmApi.token.getWalletTokenTransfers({
tackle: question.tackle,
chain: question.chain,
});
For an in depth frontend code walkthrough, use the video beneath, beginning at 15:51. There, you’ll study concerning the two core elements: “getTransaction.js” and “loggedIn.js“. The previous covers the “Transactions” part and the latter the “Streams” part of our tracker dapp’s frontend. Nonetheless, so far as the “loggedIn.js” script goes, make sure that to make use of your Firebase config particulars (19:00).
Final however not least, right here’s the video that we’ve been referencing all through the tutorial:
Web3 Pockets Tracker – Tips on how to Create a Firebase Web3 Pockets Tracker – Abstract
We coated fairly a distance in right now’s article. We began with some fundamentals, the place you had an opportunity to study what a Web3 pockets tracker is and why to make use of Firebase to create such a dapp. Nevertheless, the core of right now’s article was the “the best way to create a Web3 pockets tracker” tutorial. The latter included fairly a couple of setups. Therefore, we guided you thru all of the steps that helped you arrange your Firebase database and Moralis stream. With the setups underneath your belt, you had a chance to make use of our code to create a neat Web3 pockets tracker dapp.
Should you loved right now’s tutorial, make sure that to dive into the Moralis documentation. There, you’ll discover many different tutorials instructing you the best way to profit from Moralis’ highly effective Web3 API endpoints. Additionally, don’t overlook to make use of the Moralis YouTube channel and the Moralis weblog to develop your blockchain growth information. A number of the newest articles there discover Verse – a brand new Metaverse programming language, blockchain storage, and the best way to get any token worth utilizing NextJS and NodeJS.
As well as, you could be taken with going full-time crypto sooner reasonably than later. In that case, you must enroll in Moralis Academy to turn out to be blockchain licensed. By doing so, you’ll considerably enhance your possibilities of touchdown your dream blockchain job. Furthermore, whereas there are lots of programs ready for you on the opposite aspect, we advocate beginning with the blockchain and Bitcoin fundamentals.
[ad_2]
Source link


