

[ad_1]
The following technology of the web, Web3, is right here to disrupt the established order. Nonetheless, we’re nonetheless within the early levels of the Web3 revolution. Therefore, now is a wonderful time to start out constructing decentralized functions (dapps). Moreover, because of Moralis, anybody can get began and construct a dapp utilizing its Web3 template – the Ethereum boilerplate. With this shortcut, you possibly can have a completely useful dapp up and working in minutes. In brief, merely clone the Web3 web site template on GitHub and add your Web3 API key. The latter awaits you contained in the Moralis admin space, which you’ll entry with a free account. After all, shifting ahead, you’ll have an opportunity to observe our lead and create your first dapp with out breaking a sweat. If that sounds fascinating, create your free Moralis account and roll up your sleeves.
Are you new to Moralis? In that case, let’s get you acquainted with this powerhouse platform. Moralis, the main enterprise-grade Web3 API supplier, empowers Web2 devs to transition effortlessly into Web3 growth. You possibly can consider it as a Web2-Web3 bridge. Moreover, this Web3 dev toll is all about cross-platform interoperability. Consequently, you need to use a variety of main legacy platforms, frameworks, and programming languages to get entangled.

Be a part of Moralis Journal for the Newest in Web3 Growth
Moreover, Moralis is cross-chain interoperable and helps all of the main programmable chains. Accordingly, the Web3 template you’ll study extra about herein is a superb place to start out. The latter incorporates Web3 authentication – the start line of all dapps. In spite of everything, enabling customers to attach their Web3 wallets to your dapp is a gateway into the Web3 area. Nonetheless, our Web3 web site template on GitHub consists of some neat options, which we’ll cowl under.

Moralis’ Ethereum Boilerplate – The Final Web3 Web site Template
The Ethereum boilerplate from Moralis acts as a “Web3 web site template”. It’s the preliminary step for builders to create a dapp (or “Web3 web site”) shortly and simply. It helps you overcome all preliminary hurdles and allows you to have your MVP prepared very quickly. Listed here are the options that this boilerplate incorporates:
Web3 Authentication – Moralis’ Web3 authentication resolution is a straightforward means for guests to attach their Web3 wallets. Transactions – It showcases a web page that shows transactions for a linked pockets. Transfers – It supplies a web page that shows ERC-20 or NFT transfers for a linked pockets. Balances – Show ERC-20 or NFT balances for a linked pockets.
Along with the above-listed options, this Web3 template comes with multi-chain assist. It additionally comes with an improved responsive design. Moreover, you possibly can simply add explorer hyperlinks to balances, transactions, and extra. Furthermore, on this article, we’ll take you thru all of the setup steps for this Web3 web site template. Nonetheless, earlier than we try this, we wish to guarantee what to anticipate from this final Web3 boilerplate. As such, let’s do a fast demo of an instance dapp that outcomes from utilizing Moralis’ Web3 web site template.
The Outcomes of Utilizing the Web3 Web site Template on GitHub – Demo
So, right here’s the screenshot that reveals our instance dapp’s dashboard:
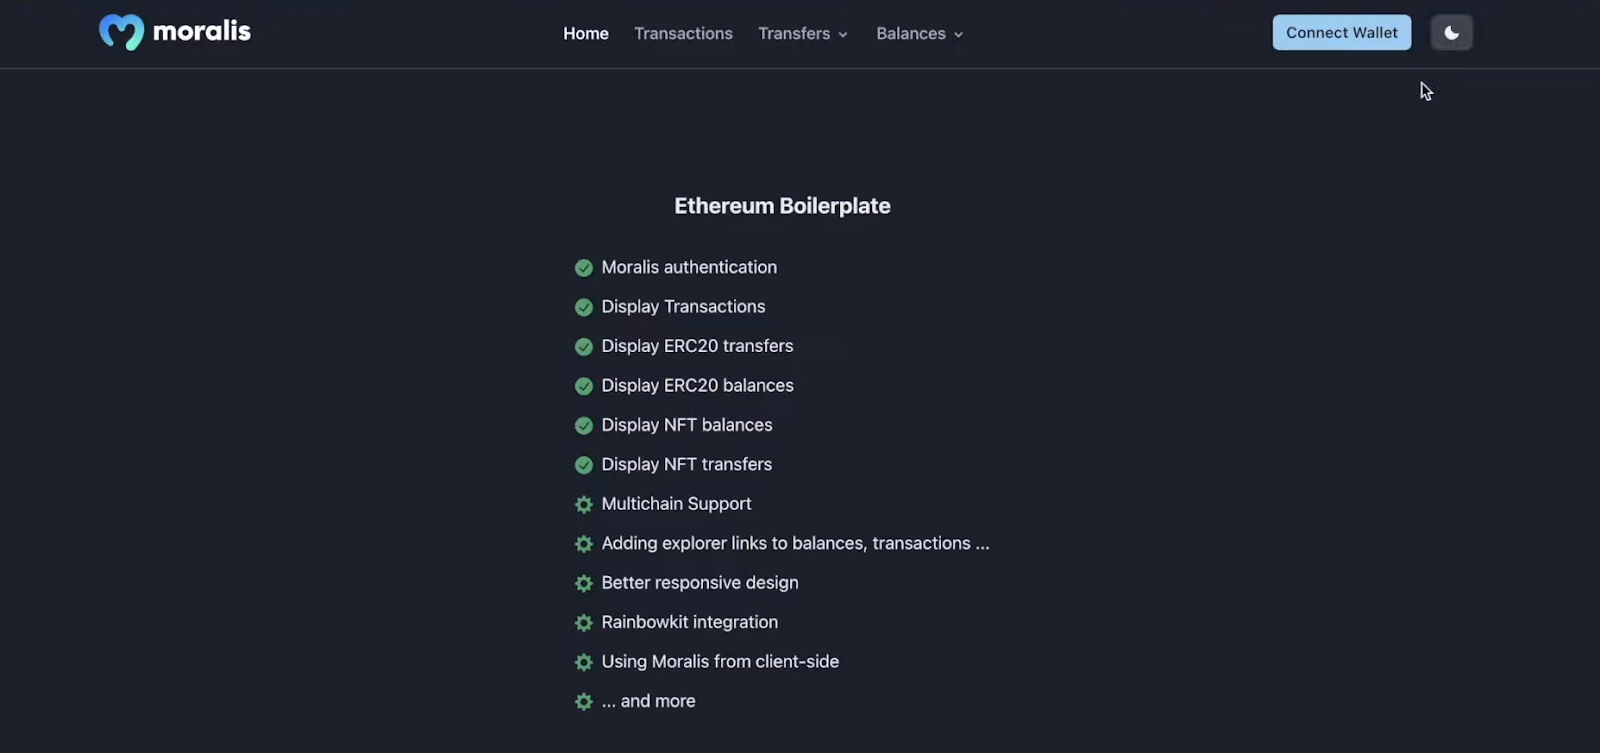
that prime menu bar within the picture above, you possibly can see that we’re at the moment on the “House” web page. Moreover, on the far right-hand aspect of the highest menu, customers can change between the darkish and the sunshine themes:

Subsequent to the darkish/mild theme change is the “Join Pockets” button. Due to the Moralis Web3 Auth API, this button triggers customers’ MetaMask extensions:
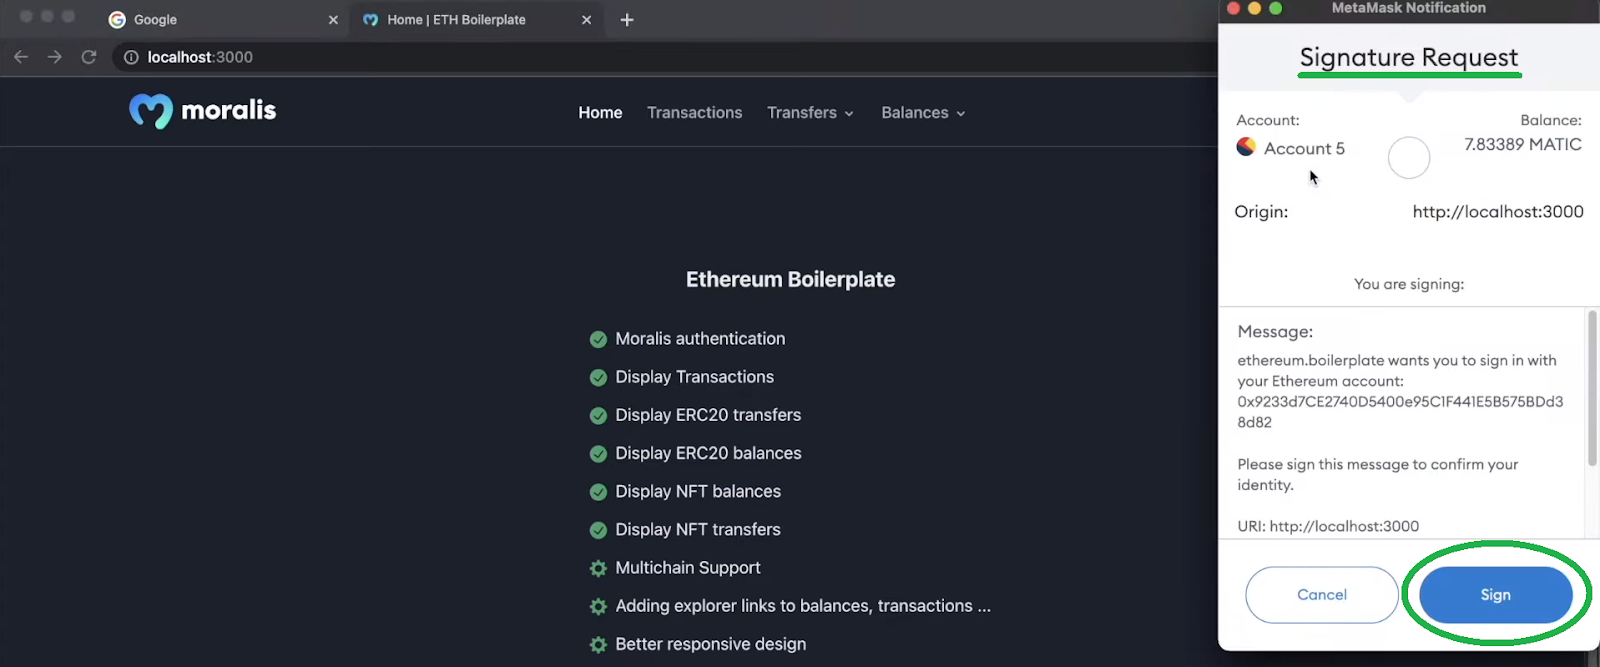
As you possibly can see within the screenshot above, customers must signal the signature request by way of the “Signal” button. After signing the message, our instance dapp shows customers’ pockets addresses as a substitute of the “Join Pockets” button:

Furthermore, as soon as customers authenticate, they’ll view their transactions on the “Transactions” web page:

The transaction particulars embody transaction hashes akin to “from” tackle, “to” tackle, the quantities of fuel used, dates of the transaction, and transactions’ standing. Moreover, customers can deal with ERC-20 or NFT transfers by choosing one of many two choices from the “Transfers” drop-down menu:

For example, that is how NFT transfers for an instance person seem like:

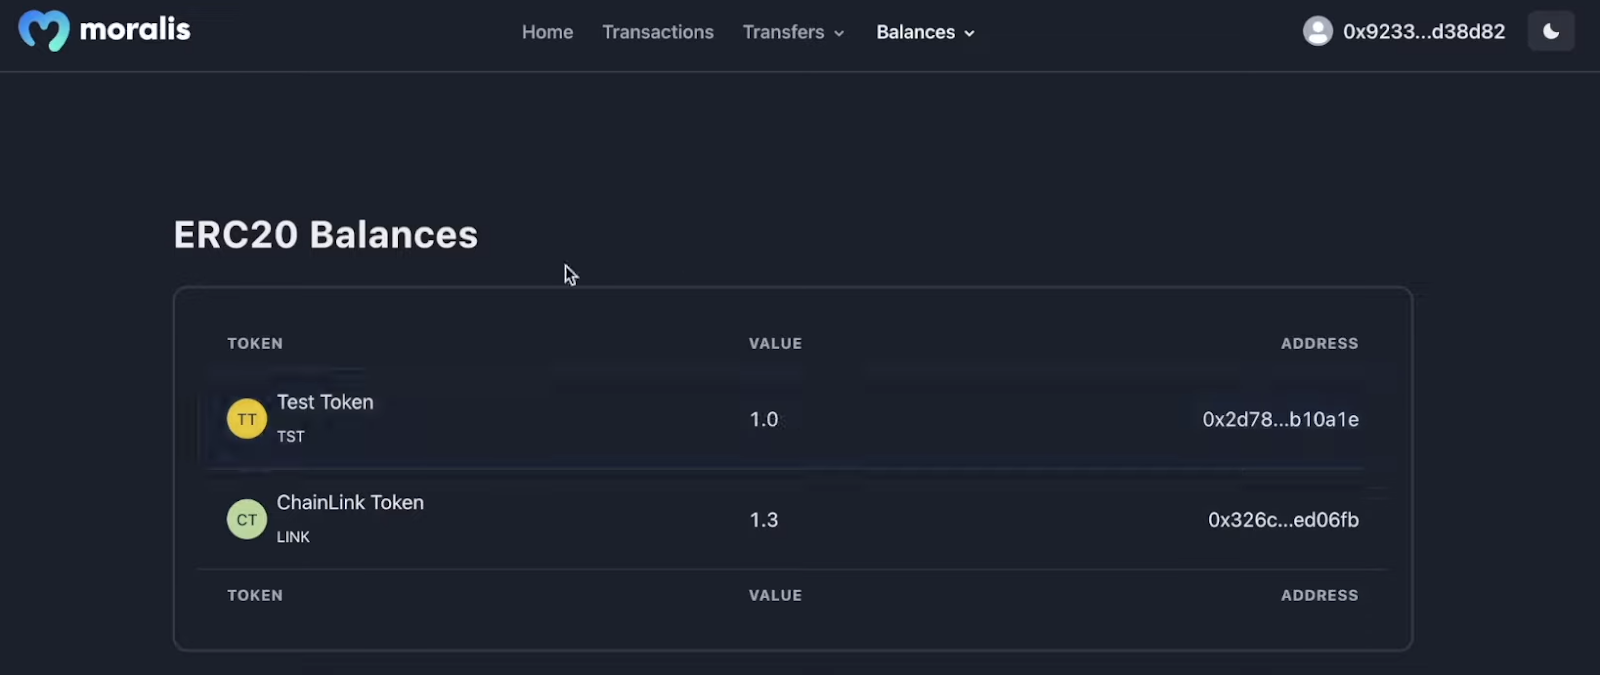
As you possibly can see, our Web3 web site template consists of a number of particulars. Together with token addresses, token IDs, “from” addresses, “to” addresses, kind of NFTs (ERC-721 or ERC-1155), dates, and transaction hashes. Final however not least, customers may also view their steadiness. Right here, they once more get to decide on between ERC-20 tokens and NFT:

Relating to displaying ERC-20 balances, our instance dapp shows tokens’ names and tickers, the variety of tokens within the linked pockets (“worth”), and tokens’ addresses:
Relating to NFTs, our Web3 template even ensures that the pictures associated to NFTs are displayed:

Furthermore, similar to with ERC-20 balances, the “NFT Balances” web page additionally shows NFT sorts, names, symbols, and quantities.
Construct a Website Utilizing a Web3 Web site Template on GitHub
After seeing what a superb dapp you possibly can create with the last word Ethereum boilerplate, you’re most certainly desperate to take it for a spin. In that case, begin through the use of Google and enter the “Ethereum boilerplate” key phrase:

Word: Usually, the highest result’s the one you wish to deal with. Nonetheless, simply in case, right here is the hyperlink to the right GitHub repository.
When you’ve accessed our Web3 web site template on GitHub, discover the “Learn me” half for extra particulars. The “About” part tells you that this template focuses on the NextJS framework. Moreover, it’s value stating that you need to use this Web3 template with Ethereum and different supported EVM-compatible chains. To proceed, copy the repo’s URL tackle:

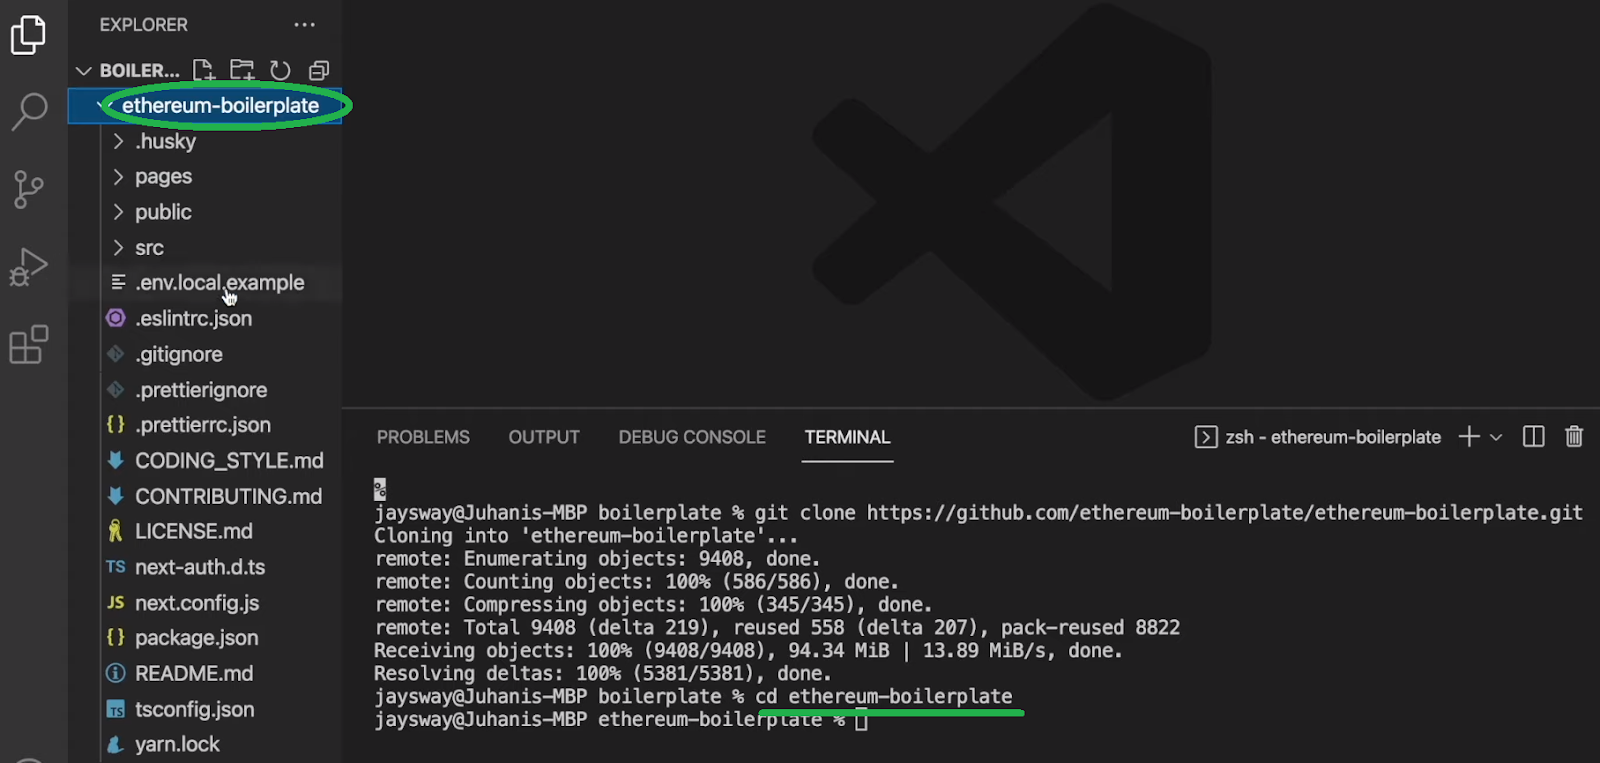
Then, open your favourite IDE. It could be best so that you can observe our lead and use Visible Studio Code (VSC). Subsequent, ensure you have a folder (“Boilerplate” in our case) into which you wish to clone the code. Then, use VSC’s terminal to run the “git clone” command adopted by the above-copied URL:
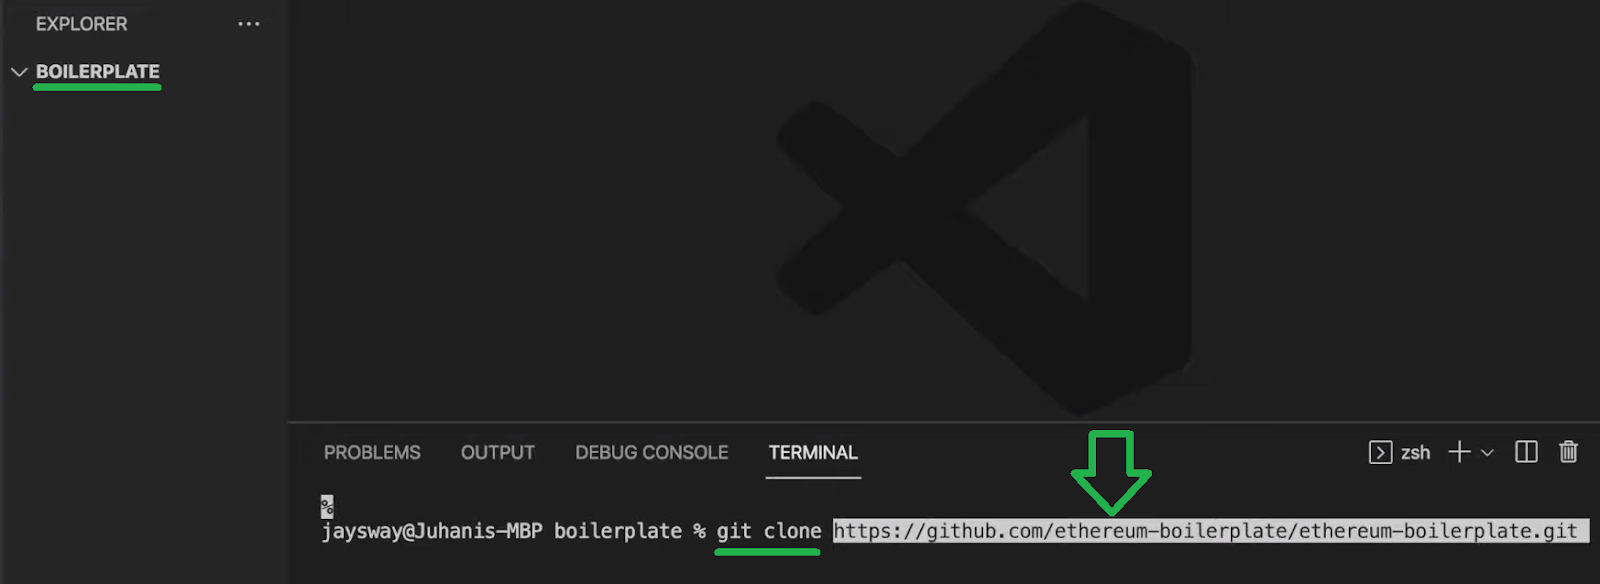
As soon as the cloning course of is full, “cd” into the “ethereum-boilerplate” folder:
Once more, be happy to discover the folders and recordsdata that are actually at your disposal. Nonetheless, to create the above-presented dapp, you need to first deal with the “.env.native.instance” file. That is the place you’ll must arrange some environmental variables:
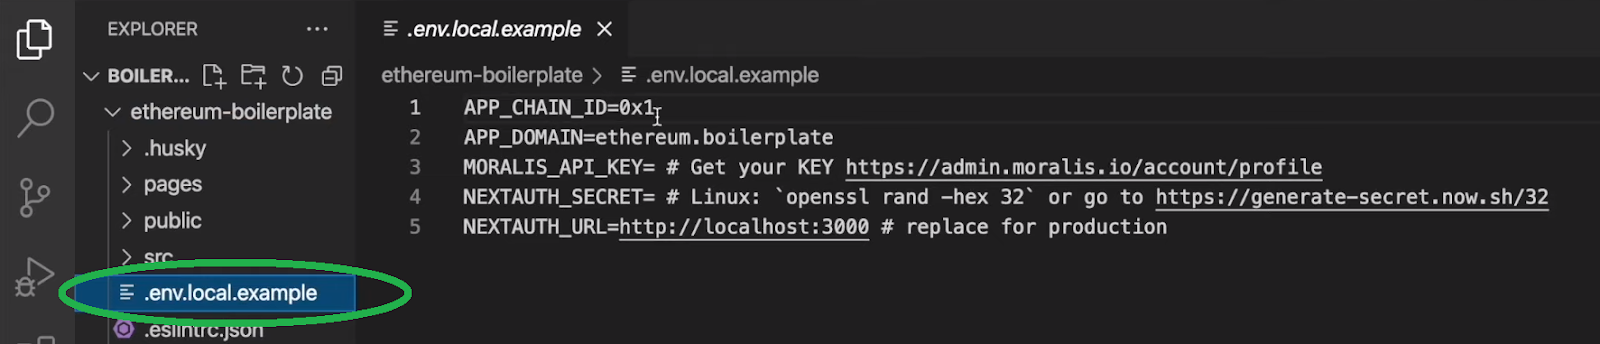
Select Your Dapp’s Blockchain
Trying on the screenshot above, you possibly can see that the highest variable is “APP_CHAIN_ID“. So, the worth for this variable will decide which chain you wish to deal with. Additional, “0x1” signifies that, by default, the code focuses on the Ethereum chain. Nonetheless, as you might need observed in the course of the above demonstration, our instance dapp runs on Polygon’s testnet (Mumbai). Thus, let’s deal with that chain. Although, understand that you possibly can construct your dapp on any of the supported chains.
Word: You will discover supported chains’ IDs by visiting the “supported chains” hyperlink.
So far as the Mumbai testnet goes, the ID is “0x13881”. Subsequent, it’s worthwhile to paste your Moralis Web3 API key.

Receive Your Moralis Web3 API Key
To acquire the API key, you want your Moralis account. So, in case you haven’t completed so but, use the “create your free Moralis account” hyperlink within the intro. Alternatively, you may also go to Moralis’ homepage and click on on the “Begin for Free” button:

Together with your account up and working, you’ll be capable to entry your Moralis admin space. There, you possibly can acquire your Moralis Web3 API key in two easy steps. First, click on on the “Web3 APIs” choice from the aspect menu, and second, copy your API key:

Then, return to your “.env.native.instance” file and exchange the placeholder’s content material with the above-copied key:

Get Your Subsequent Auth Secret
One other environmental variable it’s worthwhile to maintain is “NEXTAUTH_SECRET“. Luckily, you possibly can acquire the worth for this variable simply. Merely use the hyperlink within the “.env.native.instance” file subsequent to the variable in query. Then, use your browser to go to that URL tackle. Accordingly, you must get your “secret”:

Lastly, exchange the default content material along with your “NEXTAUTH_SECRET” worth.
So far as the “NEXTAUTH_URL” worth goes, you possibly can keep on with “localhost: 3000” (or 3001) whereas testing. Nonetheless, as soon as you might be prepared for manufacturing, you’ll need to make use of your dapp’s URL. So, when you’ve adopted our directions correctly, you must now have your environmental variables prepared:

Final however not least, be certain that to rename the “.env.native.instance” file into “.env.native”.
Putting in Dependencies
Together with your “.env.native” file prepared, you need to set up all of the required dependencies. Whether or not you might be utilizing yarn or npm, it’s worthwhile to enter the “yarn” or “npm i” command:
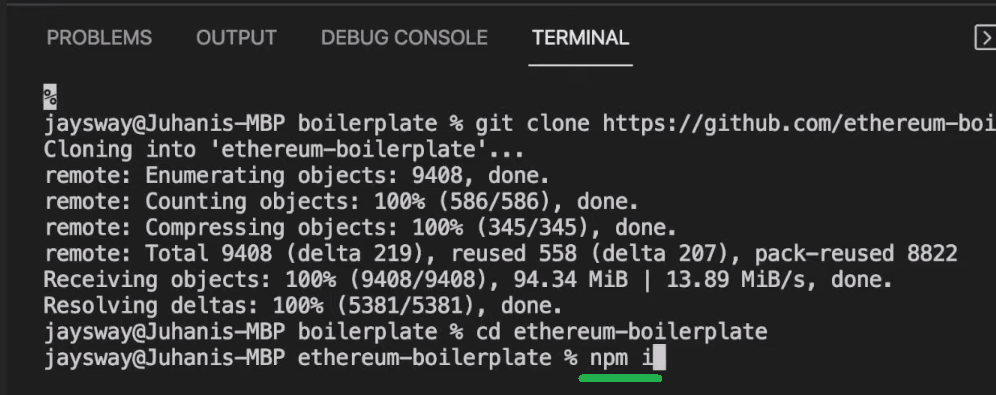
With all dependencies put in, you possibly can run your dapp utilizing the “yarn run dev” or “npm run dev” instructions:

As you possibly can see within the screenshot above, we’re utilizing port 3000; thus, our dapp was began on “localhost: 3001” as a substitute. In case you’ve gotten the identical state of affairs, be certain that to vary the “NEXTAUTH_URL” worth within the “.evn.native” file accordingly:

Now, you possibly can take your dapp for a take a look at run. Simply open your favourite browser and paste within the “NEXTAUTH_URL” tackle. After all, guarantee you’ve gotten your MetaMask extension put in and at the very least one pockets account prepared. As such, you’ll be capable to use the “Join Pockets” button to really connect with your dapp. Although, by default, you’ll even be capable to select between MetaMask or Coinbase Pockets:

If you choose MetaMask, you’ll additionally want to pick the account you wish to use (in case you’ve gotten a number of accounts):
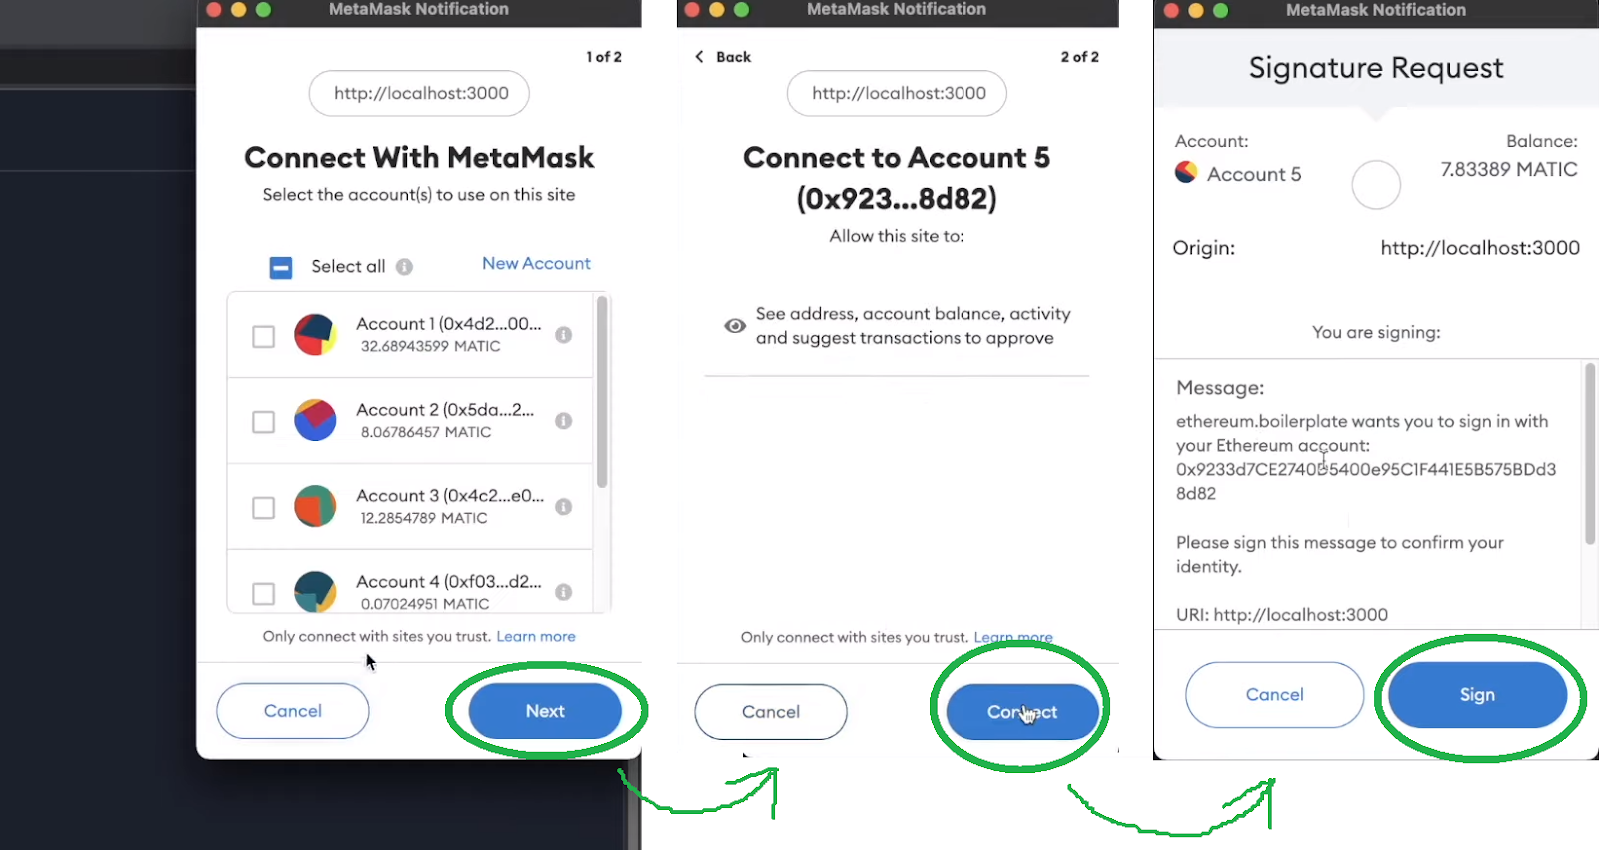
After choosing and connecting your account, you’ll must signal the signature request, as introduced within the demo part above. As soon as authenticated, be certain that to discover all of the pages of your dapp created utilizing our Web3 web site template on GitHub.
Taking Our Web3 Template Additional
As identified beforehand, this boilerplate (or Web3 web site template) is the only and quickest strategy to create a neat-looking dapp. As such, it might function an important place to begin in your initiatives or hackathons. After all, you’ll most likely wish to add different options to your dapp. In that case, you’ll need to deal with the “pages” folder contained in the “ethereum-boilerplate” folder:

Furthermore, you may also discover the “src” folder, the place you possibly can entry all of the parts (components, layouts, modules, and templates) and “utils”. For example, if you wish to change the default homepage, yow will discover it contained in the “templates” folder. As such, be certain that to discover this repository deeper and make good use of it.
Nonetheless, right here’s additionally a video tutorial taking you thru the demo and steps lined above:
https://www.youtube.com/watch?v=Bb5Pc–kyAY
Web3 Template – Construct a Dapp Utilizing a Web3 Web site Template – Abstract
In as we speak’s article, you realized that with the facility of Moralis and our Web3 web site template on GitHub, making a dapp may be completed shortly and simply. The preliminary course of consists of cloning the Web3 template (or Ethereum boilerplate code). Furthermore, as we moved ahead, you found that you could possibly deploy the dapp to Ethereum or another supported EVM-compatible chain. You do that by merely getting into the corresponding chain ID into the designated spot within the “.env.native” file. Apart from the chain ID, we additionally confirmed you how you can acquire your Moralis Web3 API key in two easy steps. You additionally realized how you can get your “NEXTAUTH_SECRET” and run your dapp regionally.
We hope you bought your fingers soiled and examined your occasion of our instance dapp. It’s now as much as you to make this decentralized software distinctive by including further pages and options. In case you want extra follow or some contemporary concepts, be certain that to discover the Moralis weblog and the Moralis YouTube channel. Each of those retailers cowl all kinds of instance initiatives – from DeFi dapps to Web3 video games. As such, you need to use these tutorials to turn into a assured Web3 developer with out prior Web3 growth expertise.
Moreover, it’s value stating that the blockchain trade affords many profession alternatives. Nonetheless, to land your dream crypto job, it helps lots if you’re blockchain licensed. Thus, be certain that to contemplate enrolling in Moralis Academy. Apart from top-notch blockchain growth programs, that is the place to get skilled mentorship, a personalised examine path, and membership in probably the most advancing communities within the crypto realm.
[ad_2]
Source link


