

[ad_1]
Are you seeking to develop dapps or different Web3 tasks for the Solana community? In that case, you might be in the fitting place, as this tutorial will delve deep into Solana sensible contract constructing and show the right way to create your personal contract! Together with writing an precise Solana sensible contract, this “Solana Good Contract Constructing” tutorial can even showcase the right way to deploy and name the contract utilizing a easy testing software. Creating the sensible contract testing software is comparatively simple, due to Moralis‘ Ethereum boilerplate, which is Solana appropriate. All you must do is clone the template and make just a few easy configurations!
The accessibility of establishing the dapp partly originates from Moralis’ Web3 template. Nevertheless, Moralis doesn’t solely allow you to develop tasks for Ethereum and Solana however options further boilerplates alike. As such, in case you are inquisitive about growing dapps for different networks, you possibly can, for instance, try the Avalanche boilerplate or Cronos boilerplate. Because of the boilerplates – and different instruments – Moralis presents the quickest technique to construct a Web3 app for any community!
So, if you wish to write sensible contracts or construct Web3 dapps, join with Moralis proper now solely without cost!
Exploring the Solana Community
Solana is an open-source, programable blockchain specializing in velocity and scalability, permitting the community to facilitate transactions shortly and at low prices. Furthermore, the “programable” attribute of the blockchain signifies that Solana helps sensible contracts. Solana sensible contracts are applications operating on the Solana blockchain, and they’re essential elements of the community’s ecosystem since they mediate agreements between community contributors. Consequently, sensible contracts make it doable for builders to construct subtle dapps (decentralized purposes) and different Web3 tasks powered by Solana.
Now, earlier than we dive deeper into the principle matter of this text, let’s discover Solana and the community’s sensible contracts a bit additional!
What are Solana Good Contracts?
Let’s now return to the fundamentals. To simplify the reason, we are going to break down the idea (Solana sensible contracts) into two components: the Solana community and sensible contracts, and start by explaining these elements individually!
Solana Labs – the group behind the community – first launched Solana’s programmable, open-source blockchain in 2017. The truth that Solana is programmable signifies that the community options sensible contracts, permitting builders to construct Web3 tasks and dapps powered by the Solana blockchain.

Solana implements a hybrid consensus mechanism combining PoH (proof-of-history) and PoS (proof-of-stake). Utilizing the 2 mechanisms allows Solana to maintain the transaction velocity excessive and prices minimal. Moreover, the emphasis on velocity and scalability makes Solana programming sooner and extra economically pleasant than some opponents.
With a fast introduction to Solana, we are going to now take a more in-depth take a look at sensible contracts. In brief, sensible contracts – additionally known as Web3 contracts – are applications constructed and saved on a blockchain community. Moreover, sensible contracts have predefined situations together with predefined actions. Consequently, when these situations meet, the actions outlined inside the contract autonomously execute. Based mostly on this, it means that sensible contracts are excellent for automating agreements with out the necessity for pointless intermediaries taking a reduce for facilitating transactions.
So, within the context of Solana, a wise contract is mainly a program saved on the Solana blockchain!
With a considerably higher understanding of a Solana sensible contract, it’s now time to discover the intricacies of Solana sensible contract constructing. As such, the next sections will show the right way to construct a Solana sensible contract simply!
Solana Good Contract Constructing – Step-by-Step Course of on How one can Construct a Good Contract
Within the following sections, we’ll delve deep into Solana sensible contract constructing and present you the right way to create your personal Solana sensible contract. We’ll moreover show the right way to deploy and name the contract. Nevertheless, to name the contract, you will need to arrange a testing dapp. To make this complete course of extra comprehensible, we are going to divide the Solana sensible contract constructing course of into the next three steps:
Rust and Solana CLI SetupWrite and Deploy the Solana Good ContractCreate the Testing Utility
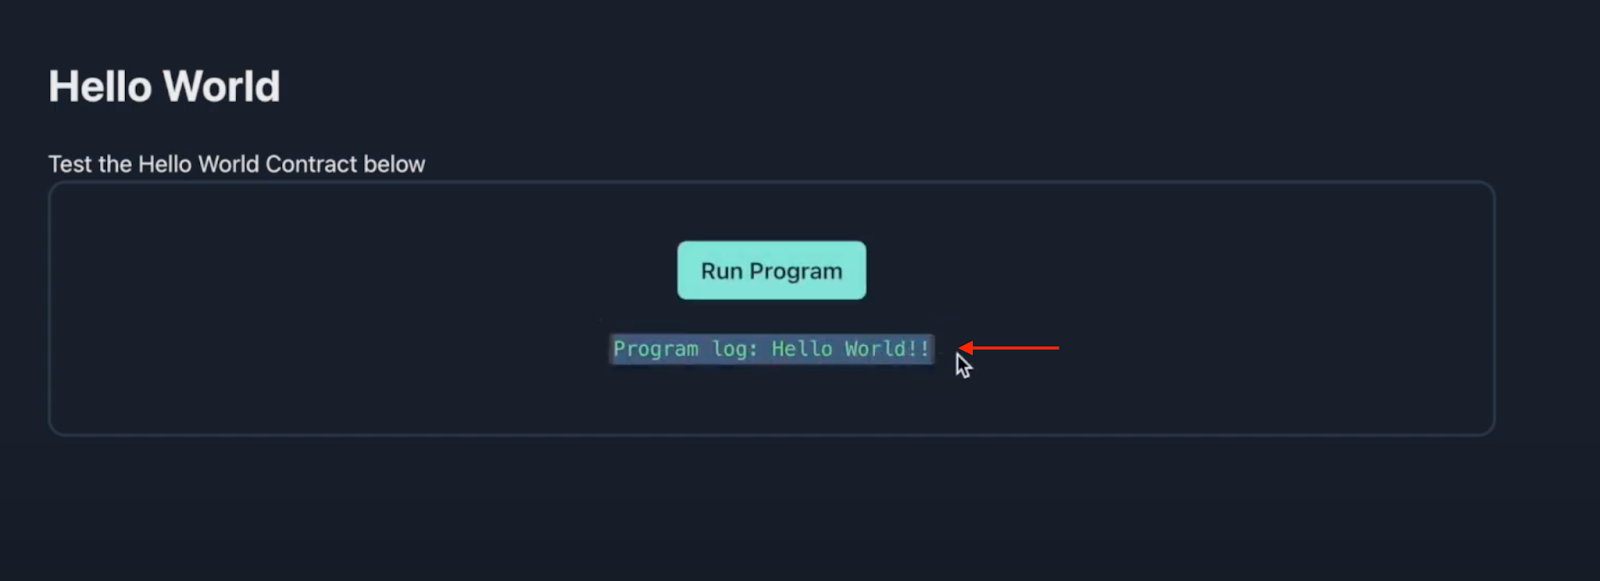
Following the three steps above will permit you to create, deploy, and name the Solana sensible contract utilizing a testing software. To indicate what you might be working in the direction of, this would be the touchdown web page for the app:

Because the above picture illustrates, you possibly can click on on the ”Run Program” button. This can immediate your Solana Web3 pockets, permitting you to signal a message and name the sensible contract. As soon as referred to as, the app will show the info log from the contract, which, on this case, is a ”Hiya World!!” message:

However, when you like watching movies to be taught as an alternative of studying, you possibly can as an alternative try the video under overlaying the aforementioned steps. Additionally, the clip supplies a extra detailed breakdown of the app’s code if this pursuits you!
Step 1: Rust and Solana CLI Setup
To start with, step one of this tutorial on Solana sensible contract constructing revolves round establishing Rust and the Solana CLI. In case you are already conversant in these two elements, be happy to skip this preliminary step and leap straight into the method of constructing and deploying the Solana sensible contract. Nevertheless, in case you are new to Rust and Solana, fear not; this part supplies an entire breakdown of the setup processes, beginning with Rust!
The primary a part of this preliminary step is to open a Unix terminal. With the terminal open, you possibly can provoke the set up course of for Rust by inputting the next command:
curl –proto ‘=https’ –tlsv1.2 -sSf https://sh.rustup.rs | sh
The terminal will current just a few set up choices as quickly as you run this command. For this tutorial, you need to decide the ”default” possibility by inputting a ”1” and urgent enter. That is what it ought to appear like in your terminal:

As soon as you choose the set up possibility, it ought to start putting in Rust for you. When the set up finalizes, the following a part of this preliminary step is to put in the Solana CLI. To put in the CLI, enter the next into your terminal:
sh -c “$(curl -sSfL https://launch.solana.com/steady/set up)”
Working the command above will set up the Solana CLI, and you will have to set the ”env path” when it finalizes. This will likely be displayed within the terminal and will look one thing like this:

With the trail set, you now have to arrange a brand new native file system and Solana pockets key-pair utilizing these two instructions:
mkdir ~/my-solana-walletsolana-keygen new –outfile ~/my-solana-wallet/my-keypair.json
With an area Solana pockets at your disposal, it’s time to set a goal cluster. On this occasion, we are going to goal the devnet cluster with the next command:
solana config set –url https://api.devnet.solana.com
Lastly, after you have specified the devnet cluster, this final command will add some check SOL to your pockets:
solana airdrop 1
Step 2: Write and Deploy the Solana Good Contract
With Rust and the Solana CLI all arrange, it’s time to delve deeper into Solana sensible contract constructing. Therefore, this half outlines the method of writing and deploying Solana sensible contracts. Additional, you will need to first open your most well-liked IDE or ”built-in improvement atmosphere” to take action.
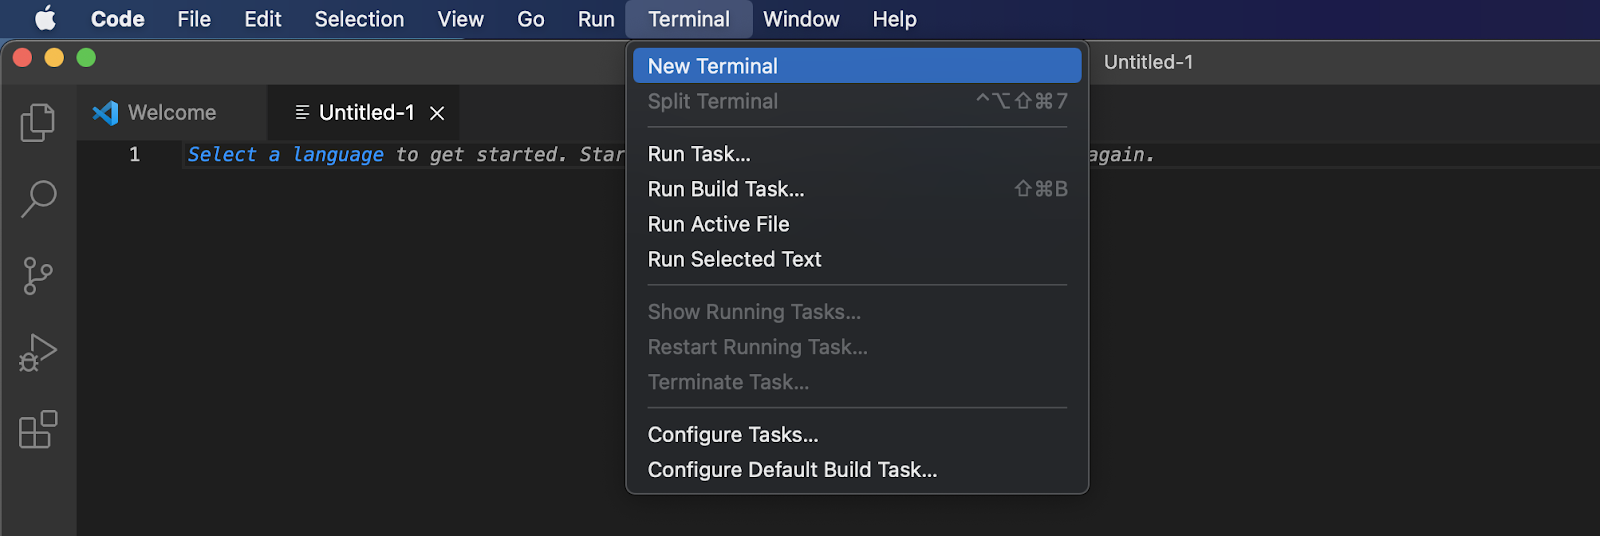
For this tutorial, we’re utilizing VSC (Visible Studio Code). When you use one other IDE, be aware that the method would possibly sometimes differ. However, as soon as your IDE is open, the following step is to arrange a brand new folder and open a brand new terminal. In case you are utilizing VSC, click on on the ”Terminal” tab on the high and hit ”New Terminal”:
With a terminal open, you possibly can create a brand new challenge utilizing Cargo by operating the next command within the terminal:
cargo init hello_world –lib
Working the command above will arrange a brand new Cargo library in your native listing with all of the information you want for Solana sensible contract constructing:

Subsequent up, progress by navigating to the ”hello_world” challenge folder utilizing the command under:
cd hello_world
Following this, you possibly can go forward and open the ”Cargo.toml” file and add the next code snippet on the finish of the file:
[lib]
identify = “hello_world”
crate-type = [“cdylib”, “lib”]
That is what it ought to appear like:

Now, earlier than writing the precise contract, go forward and add the Solana program package deal by operating the command under within the terminal:
cargo add solana_program
Lastly, it’s now time to write down the Solana sensible contract itself. To take action, navigate to the ”src/lib.rs” file and take away all of the code. First up, import the Solana program by including this code snippet to the file:
use solana_program::{
account_info::AccountInfo,
entrypoint,
entrypoint::ProgramResult,
pubkey::Pubkey,
msg,
};
Following this, specify the “entrypoint” utilizing the ”process_instruction” perform:
entrypoint!(process_instruction);
Lastly, add the ”process_instruction” perform:
pub fn process_instruction(
program_id: &Pubkey,
accounts: &[AccountInfo],
instruction_data: &[u8]
) -> ProgramResult {
msg!(“Hiya, world!”);
Okay(())
}
However, this must be the ultimate model of the ”src/lib.rs” file:
use solana_program::{
account_info::AccountInfo,
entrypoint,
entrypoint::ProgramResult,
pubkey::Pubkey,
msg,
};
entrypoint!(process_instruction);
pub fn process_instruction(
program_id: &Pubkey,
accounts: &[AccountInfo],
instruction_data: &[u8]
) -> ProgramResult {
msg!(“Hiya, world!”);
Okay(())
}
Deploying the Contract
With the contract written, you possibly can go forward and construct the Solana sensible contract by inputting this command into the terminal and hitting enter:
cargo build-bpf
Lastly, all that is still is to deploy the sensible contract utilizing the Solana deploy command:
solana program deploy ./goal/deploy/hello_world.so
When you run the command, it ought to present a program ID in return. Be sure that to maintain this ID shut at hand since you will have this within the following part:

That concludes the step of writing and deploying the contract! Within the following part, you’ll learn to arrange the testing software from which you’ll name the Solana sensible contract. In flip, it’ll permit you to be sure that the contract works as supposed!
Step 3: Create the Testing Utility
With the contract written and deployed, it’s time to create an software you need to use to name and check the Solana sensible contract. To make the method as accessible as doable, you possibly can clone a template primarily based on Moralis’ Ethereum boilerplate, permitting you to construct the appliance very quickly!
Solana Good Contract Testing App – https://github.com/johnvsnagendra/solana-smart-contract-helloWorld
To clone the testing software, open the challenge’s GitHub repository with the hyperlink above. From there, click on on the ”Code” button and duplicate the repo URL:

Subsequent up, open your IDE as soon as once more, create a brand new folder for the challenge, and open a brand new terminal. You possibly can then clone the challenge utilizing the next command with the repository URL:
git clone “REPOSITORY_URL”
Working the command above will clone the challenge to your native system. Nevertheless, you will need to make two configurations earlier than launching and testing the app. First, open the ”.env.native.instance” file and rename the file ”.env.native”. From there, you will need to add your Moralis Web3 API key to the ”MORALIS_API_KEY” variable.
If in case you have not already, you will need to create a Moralis account to get the important thing. To get going, click on on the ”Begin for Free” button on the high of the Moralis web site and observe the directions:

When you log in, navigate to the ”Account” tab, click on on ”Keys”, and duplicate the Web3 API key:

Now that you’ve got added the API key to the atmosphere variables, open the ”/src/elements/templates/helloWorld/HelloWorld.tsx” file. You possibly can then scroll right down to the nineteenth line and add this system ID you acquired when deploying your contract:

Name the Good Contract
Including the Moralis Web3 API key and program ID covers the mandatory configurations to the code. Now, all that is still is to launch the appliance, name the sensible contract, and be sure that every thing works as supposed.
As such, it’s best to now be capable to launch the app in your browser, click on on the ”Run Program” button, and signal the message to run the sensible contract. This could return the ”Hiya World!!” message:
If the testing app returns the message, you already know that the sensible contract works because it ought to! Nevertheless, when you skilled hassle in the course of the course of, try the video we linked earlier. You too can be part of Moralis’ Discord channel to ask our proficient group engineers any questions you might need!
Abstract – Solana Good Contract Constructing
This text explores the intricacies of Solana sensible contract constructing. Accordingly, the article explains the right way to write, deploy, and check a Solana sensible contract. Furthermore, to make the method extra simple, the tutorial was divided into the next three steps:
Rust and Solana CLI SetupWrite and Deploy the Solana Good ContractCreate the Testing Utility
The accessibility of this ”Solana Good Contract Constructing” information originates from Moralis. For instance, you possibly can arrange the testing software simply due to Moralis’ Ethereum boilerplate. That template makes use of numerous Moralis Web3 APIs, together with the Web3 Auth API. This API lets you combine authentication mechanisms into any of your Web3 tasks simply. If this sounds fascinating, you possibly can, for instance, learn to add Coinbase Pockets login performance!
Furthermore, when you discovered this information useful, try extra content material right here at Moralis’ Web3 weblog. As an example, learn to construct a Solana NFT explorer or create your personal Solana NFT!
However, it doesn’t matter if you wish to develop Solana tasks or construct dapps; Moralis makes all improvement endeavors really feel like a breeze! As such, join with Moralis instantly and improve your effectivity for all future improvement endeavors!
[ad_2]
Source link


